For the men behind the wheel, a.k.a. the Drivers & Dumpers out there on the road, here are a few maintenance items that you want to keep an eye on.
First of all, keep your water pump filter clean.
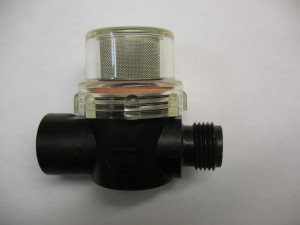
Water pump filter
It is equally important to keep your water intake filter clean.
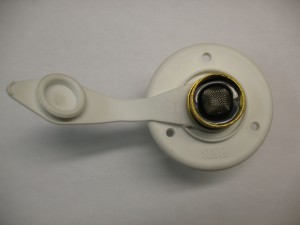
Water intake filter
If you connect often to city water, be aware that some city water systems deliver water at very high pressure (from 90 to over 100 psi). This is especially true of gravity-fed city water systems. Such great pressure could cause expensive damage your rig’s plumbing. An easy way to avoid this danger is using a 45 psi water pressure control valve like this one:
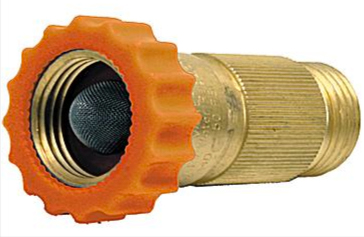
Water pressure control valve
If you have an anode rod in your hot water heater, check it periodically. Chemicals in hard water will corrode it to the point where it will have to be replaced. If you don’t replace it, your water will smell like rotten eggs.
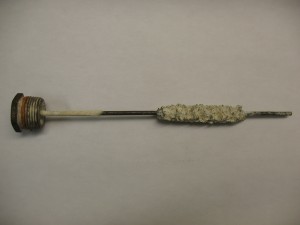
Corroded anode rod
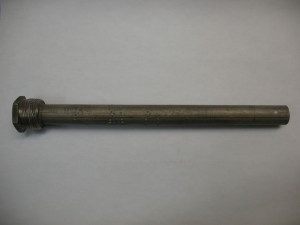
Good anode rod
You should turn off your hot water heater 24 hours before you remove your anode rod. Follow these simple steps:
- Take the pressure off (turn off your water pump or disconnect from city water).
- Open hot water heater tap
- Leave open tap
Once you have fully drained your hot water heater, you can safely remove your anode rod without fear of being scalded.
When you replace your anode rod, it’s a good idea to use teflon tape around its thread. To remove your anode rod, you need a 1 & 1/16” wrench.
You also need to drain your hot water heater before winterizing your rig.
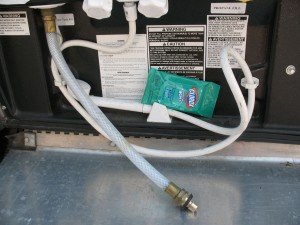
Short hose with quick-connect
You can attach a short hose with a quick connect at one end to your water intake valve; this will save you a lot of headaches whenever you need to attach your hose to city water.
A fire hose is a space saving alternative to a bulky garden hose.
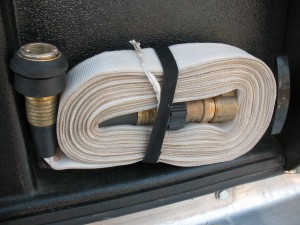
Canvas fire hose
To clean out your fresh water tank, you can get a feeder bottle with Clorox that you can attach to your hose and spray a little into your short hose. If you don’t have a feeder bottle, just pour a little Clorox into your short hose before attaching your water hose.
When you are dry-camping and need to fill your fresh water tank from a jug, invert your water intake screen filter so its convex curvature pushes open the fresh water tank shut-off valve. and you can gravity-pour water into your fresh water tank.
In states that have very hard, gritty or sandy water such as Arizona, Texas and California, it’s a good idea to purchase a filter bank to attach to your hose before filling your fresh water tank.
Fire extinguishers should be serviced every 6 years and hydro-tested every 12 years. It’s very important to check your fire extinguisher periodically. Many an RVer has deplored not doing so after his or her rig caught on fire. If you have a dry powder fire extinguisher, a.k.a. a Canadian gun, take it off its mounting bracket and tap it lightly with a rubber hammer at the bottom end to loosen up powder that may have settled down. It should sound hollow to your ear when you tap it. (The reason dry powder extinguishers are called Canadian guns is because, as you know, by law guns are not permitted in Canada. So if you are attacked, you can spray your fire extinguisher on the face of your assailant. It will momentarily blind him, and he will be covered in yellow dust. You can then call the police, who will be able to easily identify the attacker.)
If you can afford it, get a CO2 fire extinguisher; they work much better than dry dust fire extinguishers. They are not messy like their dry dust brethren, and they will not stop working because the dust settled down and caked. Fire needs three elements to thrive: oxygen, heat, and fuel. If you take out any one of those three elements, fire will immediately die down. That is why CO2 extinguishers work so well: they starve the fire from oxygen. To effectively douse a fire, do not aim at the flames. Rather, aim your fire extinguisher just above the base of the flames, to shoot off their air supply.
Black water tank gauge monitors often give inaccurate readings, generally showing a higher level of fill than is actually there. The cause is often toilet paper that has not dissolved and is shorting out two or more gauge terminals in your black water tank. Therefore, always use toilet paper designed to dissolve rapidly, such as the Enviro-SOFT toilet paper sold by Camping World.
Also, you should be aware that in the RV world, there are two kinds of people: folders and wadders. Folders use much less toilet paper for their hygienic needs, but wadders can cause a big problem in your black water holding tank. So the rule of thumb in your RV is to ask if a potential user of your toilet is a wadder or a folder. You can confidently allow folders to use your toilet, but you better send wadders to a public toilet!
You can check how full your black water tank is by turning off your water pump (or disconnecting from city water), opening your toilet’s drain valve and shining a flashlight down the drain so you can see how high the level of black water is in your tank. A flashlight with a wrist strap is highly recommended; you don’t want to accidentally drop your flashlight in your black water tank!
Every once in a while, it’s a good idea to fill your toilet with water and add a good amount of dishwashing liquid, then flush the mixture down. Dawn anti-bacterial dishwashing liquid works best. Some RVers also recommend dropping three or four denture cleaning tablets in your black water tank; they too are antibacterial and also have a beneficial effervescent action. Target sells generic denture cleaning tablets that are much cheaper than brand name ones.
Some RVers suggested dropping a few ice cubes in your black water tank to dislodge stuck solids and help mash them while you are driving. However, if your rig is equipped with a macerator pump, a word of caution is necessary: make sure that all the ice is melted before you turn on your macerator pump, as ice particles can destroy your macerator pump’s blades.
Many RVers dump their black water tanks after camping for a few days. This practice is not ideal, as solid waste will tend to pyramid under your toilet. It is better to dump your black water tank upon arrival at a campgrounds, after a long day’s drive. After your rig has been bouncing around on the road, you can be sure that all solids will be sufficiently shaken and mashed in your tank.
Another great tip from Don Klassen is this one: after you have emptied your black water tank, shut off your macerator pump. Leave your black water tank’s exit valve open. Then open your grey water tank exit valve and let gravity partly fill your black water tank with grey water, until the levels of water in both tanks are equal. Now shut your grey water tank exit valve and turn your macerator pump back on. This will give you an additional amount of grey water to really flush out your black water tank with cleaner grey water. When your black water tank is empty, shut off your macerator pump, shut your black water exit valve, open your grey water exit valve and turn your macerator pump back on to finish emptying out your grey water tank.
Bill Harter also gave us some great RVing Tips as well. It’s important to keep your black and grey water exit valves well lubricated to prolong the life of their seals. You can easily do this pouring one cup of cooking oil down your toilet and one cup of cooking oil down your shower drain every year. To lubricate your toilet valve, use Kwik Lube brand grease spar. Do not use WD40, which is wax based and will clog up your valves. You can also use the same Kwik Lube grease to lubricate your rig’s electric step and the gears of your crank-up Winegard TV antenna.
An electrical surge protector is also a good idea. Many campgrounds can have power surges or low voltage that can damage your electrical components. Gene Holcomb has one hardwired in his rig. He recommends one from Progressive Industries. Gene also uses a voltmeter to check voltage in campgrounds. The one he uses can be purchased at Radio Shack. And he also monitors the state of charge of his batteries using a 1224 Volt LCD Voltage Meter that can be plugged in to a cigarette lighter outlet.
Serena has a Dometic refrigerator that can work using propane, 120V AC, and 12V DC. Propane is the most efficient fuel to use with your refrigerator. It is best for cooling down your fridge. 120V AC is good for medium cooling, so when you are in a campsite with hook-ups, you can plug your rig in to AC and switch your refrigerator to 120V AC, thus saving your propane. 12V DC is not a good way to run your refrigerator, as all it does is maintain the temperature of the fridge. In very hot weather, it’s a good idea to add a fan on the outside of your fridge. A muffin fan from a computer can do the trick, although we would prefer to add a Dometic fan kit.
To keep your generator in good condition, it’s important to run it under load for twenty minutes once a month. Under load means running your microwave, for example.
In winter, it’s a good idea to leave your rig plugged in to AC and keep your refrigerator running on 120V AC. This will put enough draw, so your house batteries won’t be overcharged. Also, it is healthier for your fridge to keep running than for you to turn it off and on again every season. After all, you keep your refrigerator at home running all the time, don’t you? Why should you treat your RV’s fridge any different?
If you don’t keep your rig plugged in to AC in the winter, you should disconnect the negative terminal of your house batteries after you have checked that they are sufficiently charged.
Our rig is equipped with a propane shut-off valve located externally in the utilities compartment. Whenever you fill your propane tank, you should shut off your propane line to the interior of your rig for safety. And the same is true when you re-fuel your diesel or gasoline tank!
The Awesome brand cleaner, available at Dollar Tree stores, is great for removing bugs from your rig’s front end. Dilute it to 50% in water. Another cleaner that works well is Simple Green.
We would like to thank Gene Holcomb, Brad Wall, Don Klassen and Bill Harter for their tips and techniques.


